Batched EVM transactions using Cadence
Developers who integrate Cadence into EVM applications on Flow lets them leverage the best of both worlds. This guide demonstrates how to batch EVM transactions with Cadence, which applications to embed multiple EVM transactions in a single Cadence transaction while conditioning final execution on the success of all EVM transactions.
This feature can unlock experiences otherwise impossible on traditional EVM platforms, which supercharges your EVM application.
Objectives
After you complete this guide, you'll be able to
- Construct a Cadence transaction that executes several EVM transactions such that if any EVM transaction fails, the entire set will revert.
- Read and write from smart contract functions on EVM Flowscan.
- Run a Cadence transaction from the browser using Flow Runner.
- Install conceptual understanding of Cadence X EVM interactions.
- Inspect multiple EVM transactions embedded in a Cadence transaction with Flowscan block explorer.
- Write code that interacts with the EVM via a CadenceOwnedAccount (COA).
Prerequisites
Before you dive in, make sure you have the following configured:
- MetaMask installed in your browser with an active account.
- Flow Wallet extension installed in your browser with an active account.
- Both wallets funded with Testnet FLOW. See the Faucet guide for more information.
Overview
For the purposes of demonstration, this walkthrough will focus on relatively simple EVM operations in addition to first creating a Cadence-controlled EVM account (COA). Specifically, we will:
- Wrap FLOW as WFLOW.
- Approve an ERC721 to transfer WFLOW in exchange for an NFT mint.
- Mint an ERC721 token - this ERC721 has a 50% chance of failing (using onchain VRF to determine success).
These operations let us focus on the core concepts of this guide:
- Batching EVM transactions with Cadence.
- Conditioning execution on the results of those EVM transactions.
However, with these same principles, you'll have the power to address more complex use cases. For instance, replace wrapping FLOW with a DEX swap. Or instead of minting an ERC721, purchase an NFT listing from a marketplace.
Combine these two, and suddenly you can purchase NFTs with any ERC20 token, all in a single Cadence transaction, reverting everything if a single step fails.
The point is, while a simple use case, this guide will give you the tools to build much more complex and interesting applications. So let's get started!
Components
As mentioned in the Overview, this guide involves three main actions:
- Wrapping FLOW as WFLOW.
- Approving an ERC721 to transfer WFLOW in exchange for an NFT mint.
- Minting an ERC721 token.
Before we interact with these contracts, let's dig bit more into the components of this guide.
Wrap FLOW as WFLOW
On Flow EVM, FLOW is the native currency and similar to other EVM platforms, the native currency is not accessible as an ERC20 token. To interact with ERC20 contracts, you need to wrap FLOW as WFLOW (Wrapped FLOW). This is Flow's equivalent of WETH on Ethereum.
You can find WFLOW deployed to 0xd3bF53DAC106A0290B0483EcBC89d40FcC961f3e on Flow Testnet & Mainnet and source code in the @onflow/flow-sol-utils repository.
Approve ERC721 Transfer
Our example MaybeMintERC721 contract accepts WFLOW in exchange for minting an NFT. However, the contract cannot move WFLOW without your permission. To allow the contract to move your WFLOW, you must approve the contract to transfer enough of your WFLOW to mint the NFT.
Mint ERC721 Token
Finally, we'll mint an ERC721 token using the MaybeMintERC721 contract. This contract has a 50% chance of failing, wheich simpluates a real-world scenario where purchasing an NFT might fail - say a listing was purchased before your transaction was processed.
Importantly, if this transaction fails, we want to revert the entire sequence of transactions. After all, you wrapped FLOW to WFLOW and approved the ERC721 transfer specifically to mint this NFT. If the mint fails, you want to unwind everything. As we'll see shortly, this is where batching EVM transactions using Cadence is extremely powerful.
Interact with the contracts
Before we take the easy route, let's first interact with the contracts individually to better understand the process and status quo user experience. Realistically, this is your only option for completing the whole process on other EVM platforms.
Recall in Prerequisites that you need to have both MetaMask and Flow Wallet extension installed and funded with Testnet FLOW. Make sure you've done so before you continue.
Use MetaMask
1. Wrap FLOW
Our first action will be to wrap enough FLOW to cover the cost of minting the MaybeMintERC721 token. To do this, we'll interact with the WFLOW contract on Testnet.
There are a number of ways we could interact with this contract - Remix IDE, Foundry's CLI, Hardhat, and so on. - but for the purposes of this guide, we'll use the Flowscan EVM block explorer.
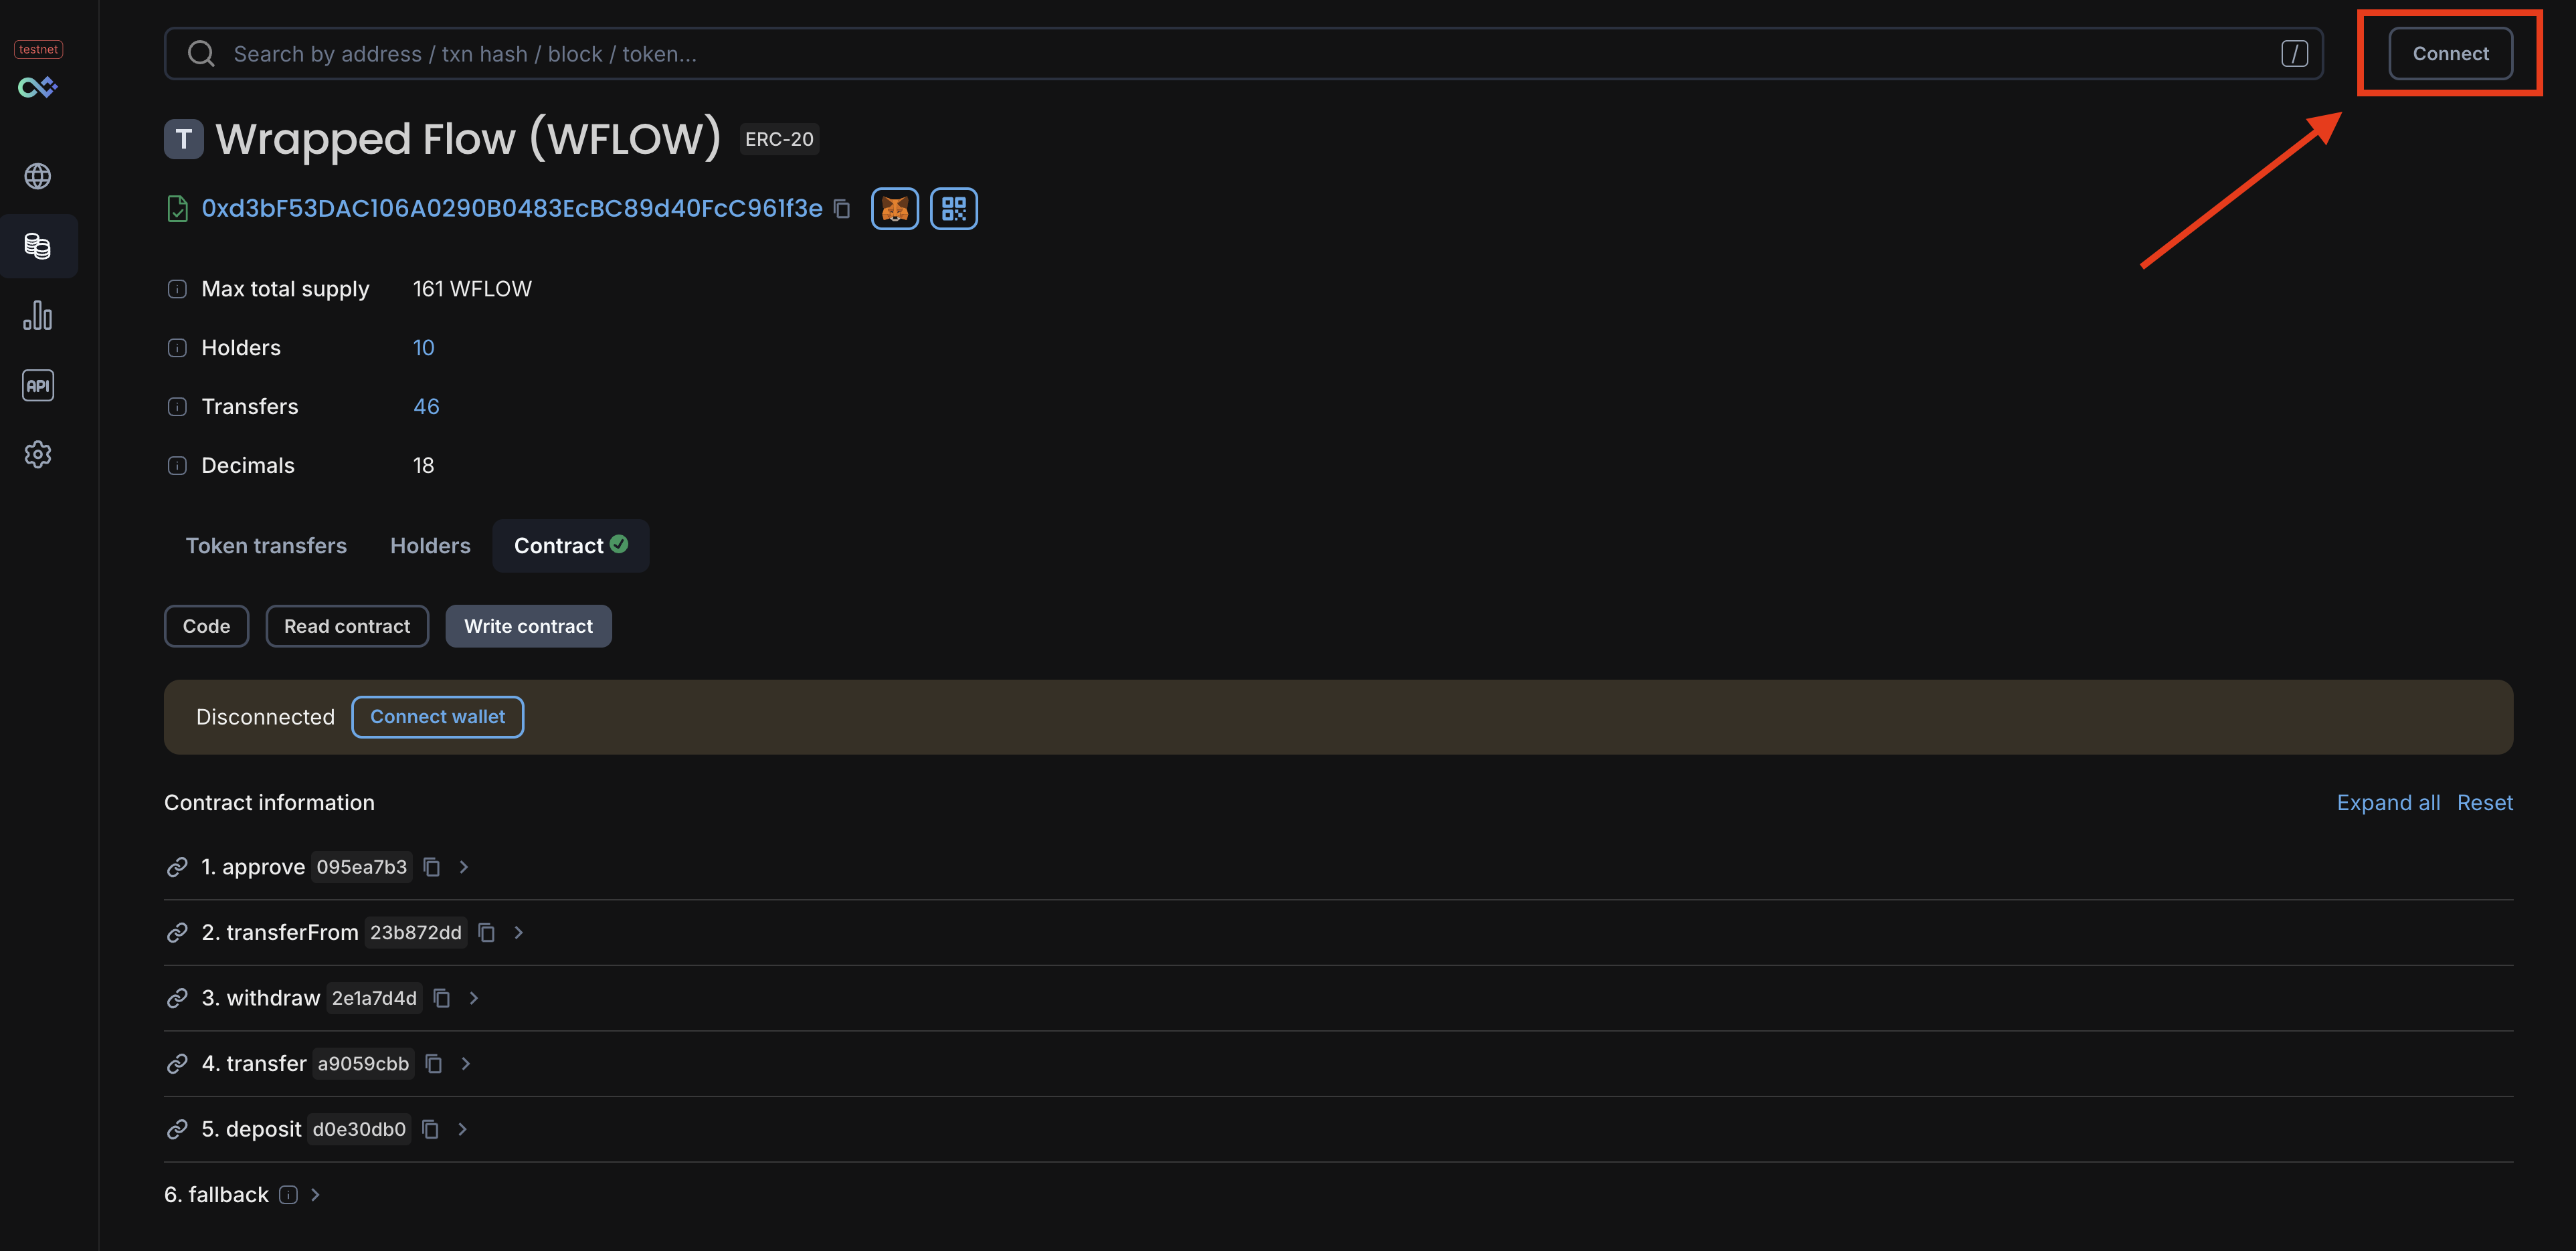
Navigate to the WFLOW Testnet contract on Flowscan: WFLOW. Make sure you're on the Write Contract tab, which allows you to interact with the contract's mutating functions.
Before you can interact with the contract, you need to connect your MetaMask wallet to the Flowscan EVM block
explorer. Click Connect in the top right corner and follow the prompts to connect your MetaMask wallet.
There are two separate block explorers for Flow - one for Cadence activity and another for EVM activity. This is unique to Flow and is due to the fact that Cadence & EVM are separate runtimes, with EVM effectively emulated within Cadence. This orientation - that of EVM running within Cadence - means that the Cadence-side explorer has visibility to EVM transactions embedded within a Cadence transaction.
Practically, this means that you can view any transactions run with a Flow native account on the Cadence explorer, while you can view any transactions run with an EVM account on the EVM explorer.
After you connect, you will see your address in the top right corner and above the contract's functions.
Now we can wrap FLOW. Click the deposit method which will drop down an input field for the amount of FLOW you want to wrap. The mint amount for the MaybeMintERC721 contract is 1 whole FLOW which in EVM terms is 1e18 wei - wei being the smallest unit of an EVM's native currency (inherited from Ethereum's units - more on Ether units here).
As shown below, put 1 000 000 000 000 000 000 in the input field for deposit.
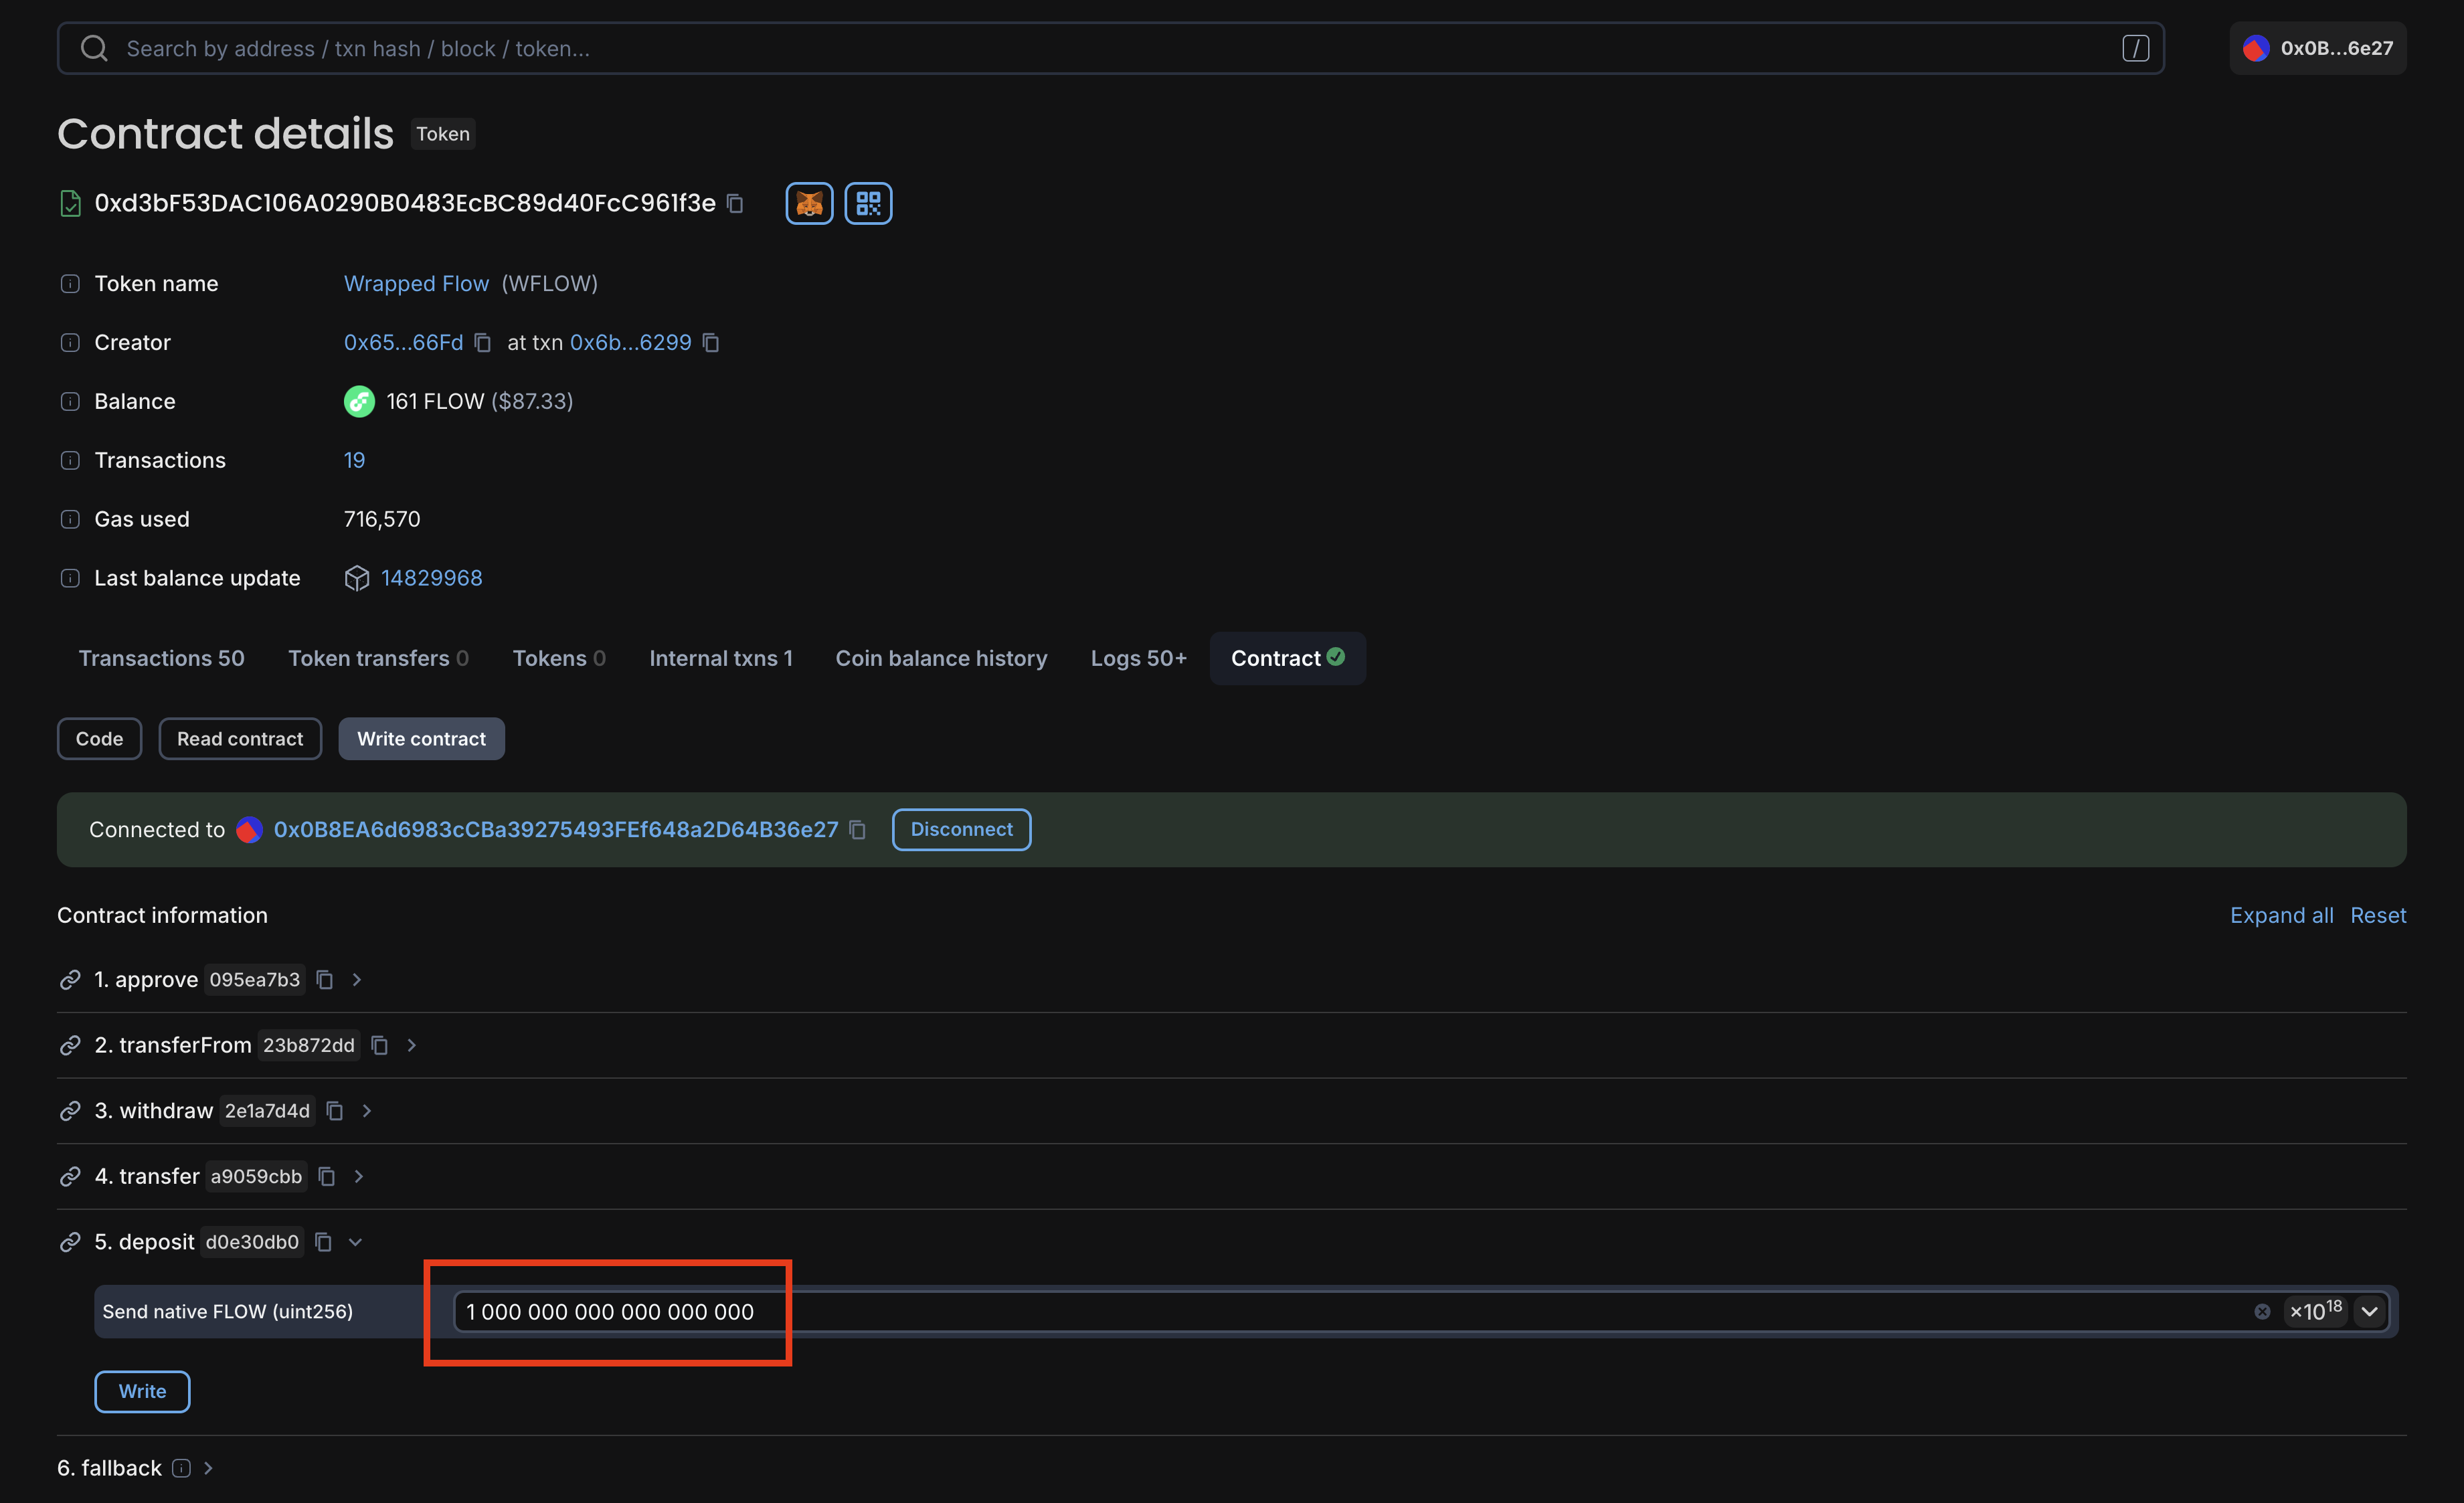
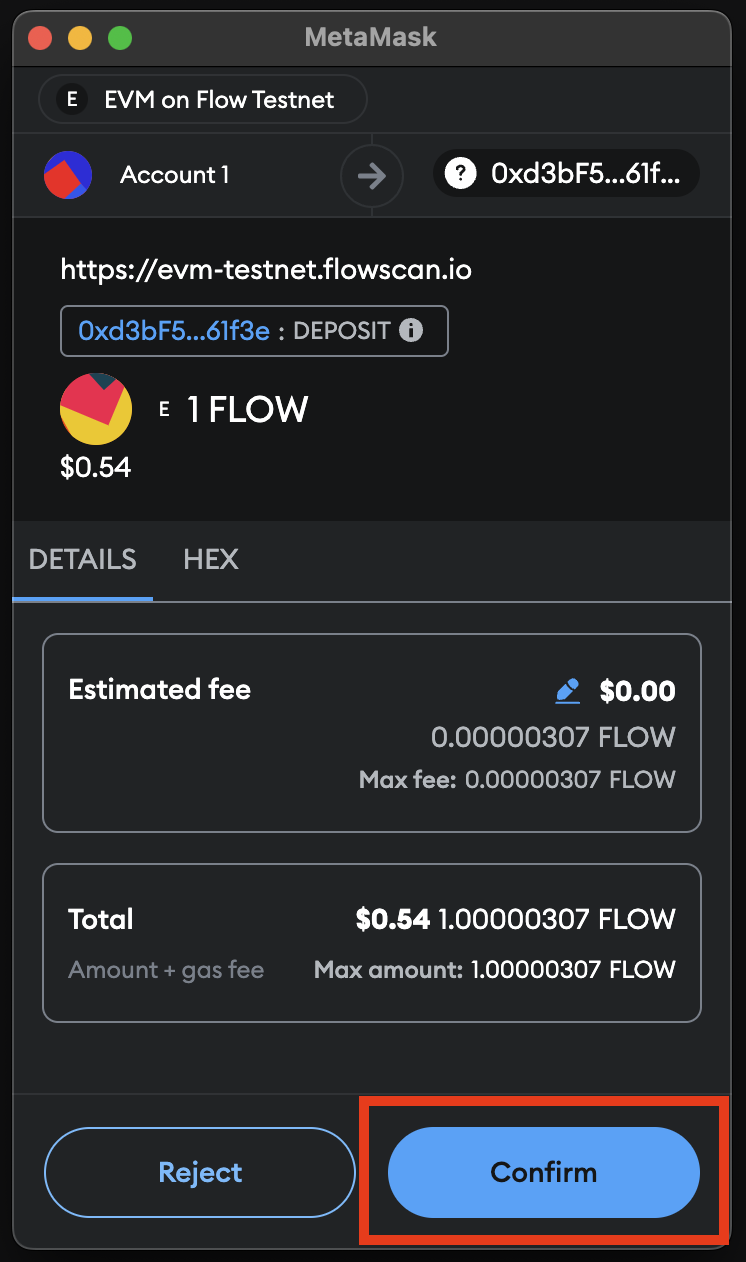
You can now click Write to submit the transaction. When MetaMask prompts you to sign the transaction, click Confirm and give it a few seconds to process.
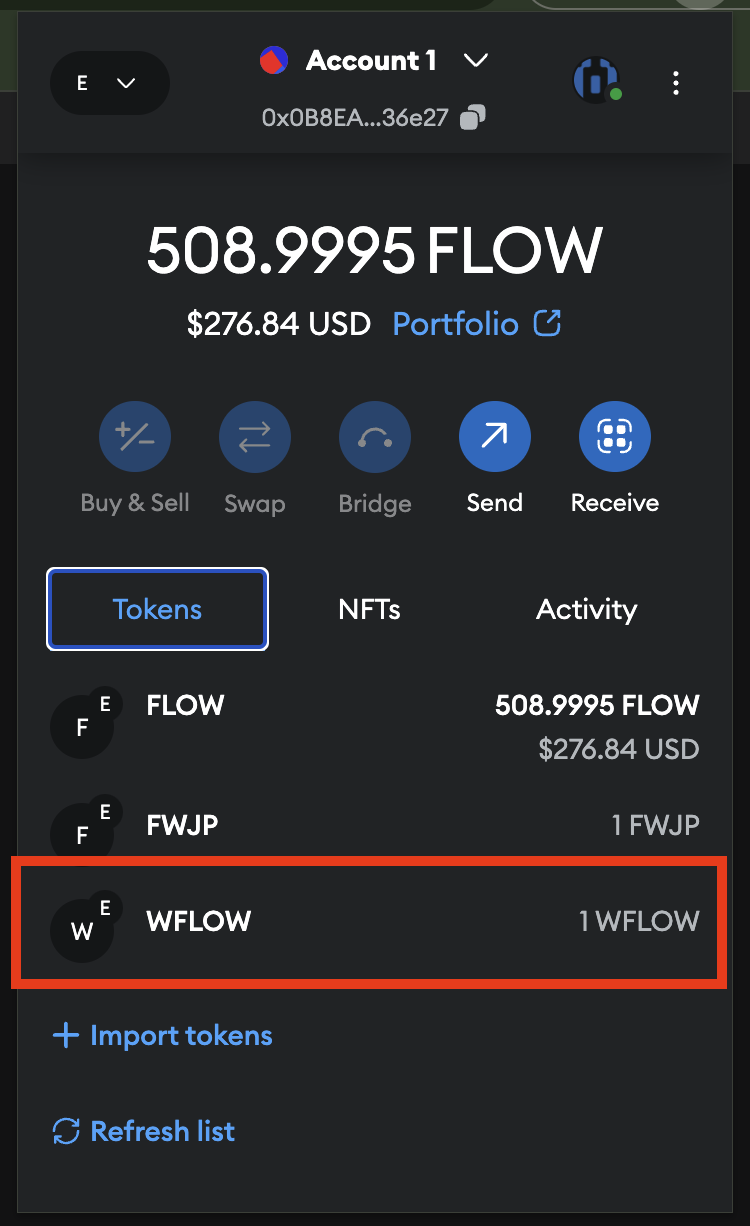
When confirmed, you can see WFLOW balance in your tokens list in MetaMask - if not, click Import Tokens and paste the WFLOW contract address found on the Flowscan page and refresh your list.
2. Approve WFLOW Transfer
Now that you have your WFLOW, you'll need to approve the MaybeMintERC721 contract to transfer your WFLOW. From the same WFLOW page in Flowscan, click the approve method. This time, you'll need to input the MaybeMintERC721 contract address - 0x2E2Ed0Cfd3AD2f1d34481277b3204d807Ca2F8c2 - and the amount of WFLOW you want to approve - again 1 000 000 000 000 000 000 WFLOW.
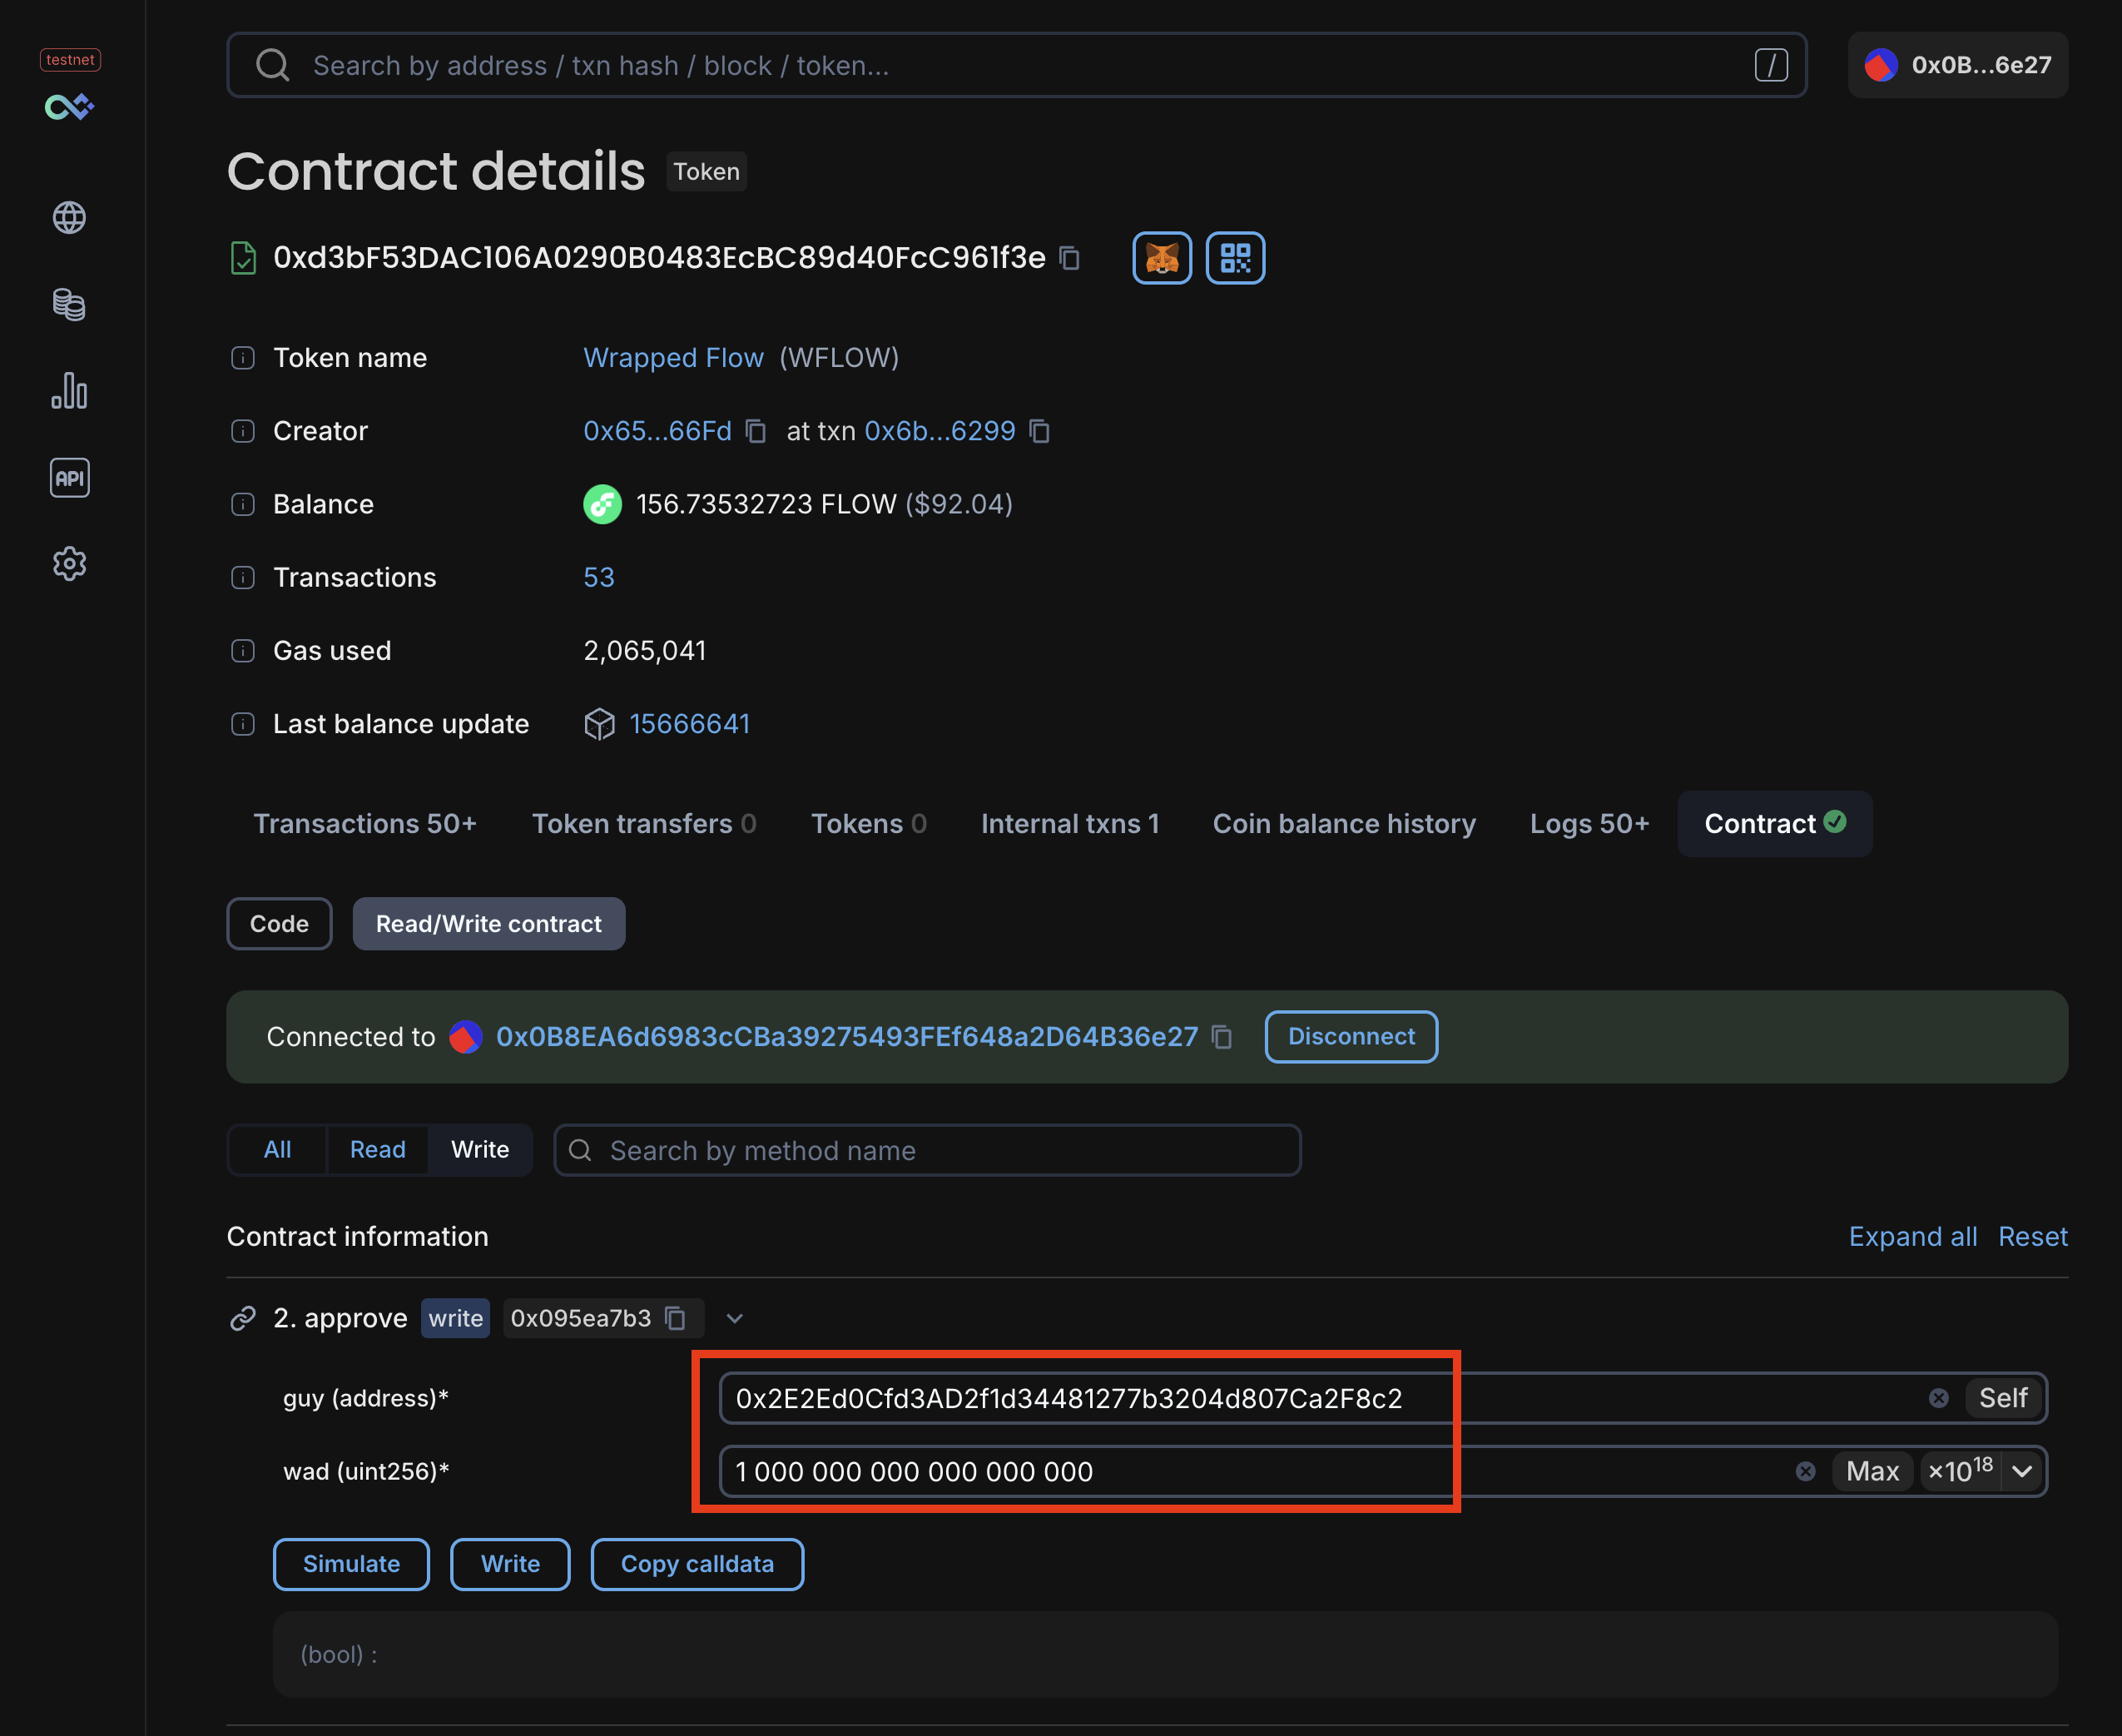
Click Write to submit the transaction. To be clear, this does not complete a transfer, but allows the MaybeMintERC721 contract to transfer your WFLOW on your behalf which will execute in the next step.
3. Mint ERC721 Token
Finally, we'll attempt to mint the ERC721 token using the MaybeMintERC721 contract. Navigate to the MaybeMintERC721 contract on Flowscan: MaybeMintERC721.
Again, you'll see the contract functions on the Write Contract tab. Click the mint function which takes no arguments - just click Write and then Confirm in the MetaMask window.
This contract has a 50% chance of failing on mint using onchain randomness. If it fails, simply mint again until it succeeds.
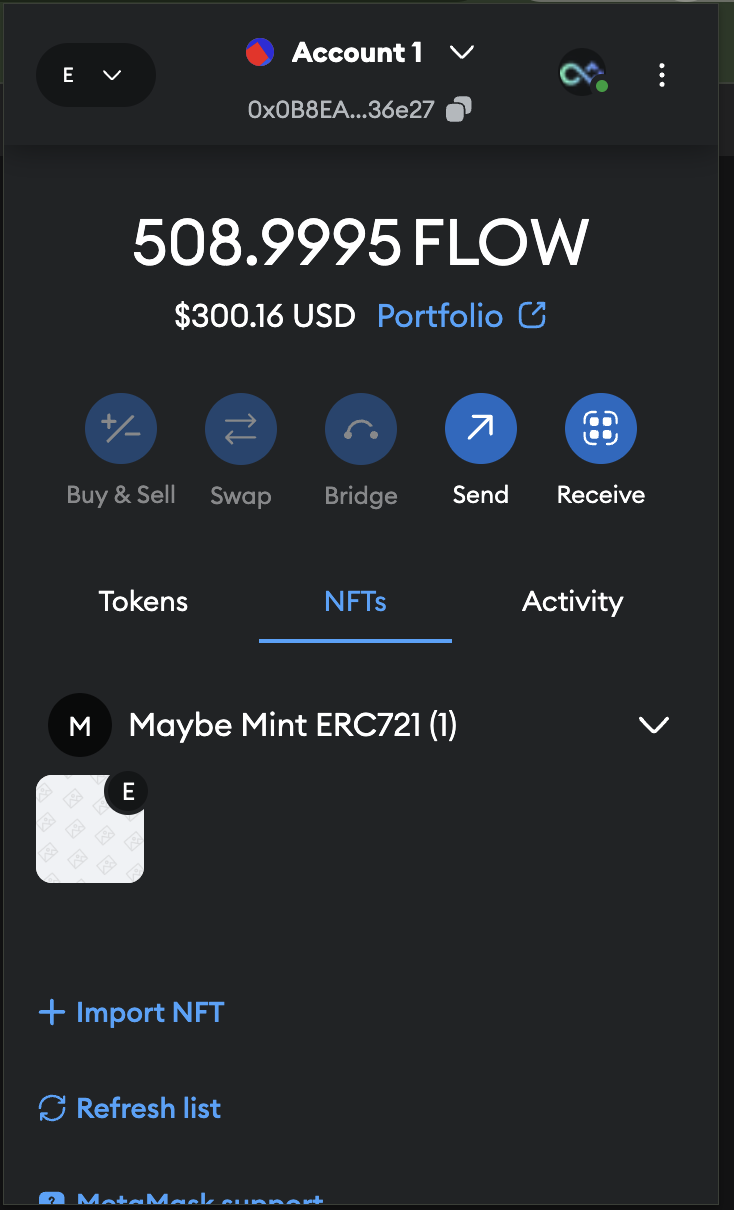
When it succeeds, you can click your NFTs in MetaMask to see your newly minted token.
Recap
This process is cumbersome and requires multiple transactions, each of which could fail. Given the intent of the process - minting an NFT - if this were a case where the NFT was a limited edition or time-sensitive, you'd be left with WFLOW wrapped and approved for transfer, but no NFT and would need to manually unwind the process.
Or you could just use Cadence to batch these transactions and revert everything if the mint fails. Let's do that.
Use Flow Wallet
Before we dive into the "how", let's execute the batched version of everything we just did with Flow Wallet. This will give you a sense of the power of Cadence and the Flow blockchain.
The transaction below, like all Cadence transactions, is scripted, allowing us to execute a series of actions. It may look like a lot at first, but we will break it down step by step in the following sections.
wrap_and_mint.cdc
_140// TESTNET IMPORTS_140import FungibleToken from 0x9a0766d93b6608b7_140import FlowToken from 0x7e60df042a9c0868_140import EVM from 0x8c5303eaa26202d6_140_140/// This transaction demonstrates how multiple EVM calls can be batched in a single Cadence transaction via_140/// CadenceOwnedAccount (COA), performing the following actions:_140///_140/// 1. Configures a COA in the signer's account if needed_140/// 2. Funds the signer's COA with enough FLOW to cover the WFLOW cost of minting an ERC721 token_140/// 3. Wraps FLOW as WFLOW - EVM call 1_140/// 4. Approves the example MaybeMintERC721 contract which accepts WFLOW to move the mint amount - EVM call 2_140/// 5. Attempts to mint an ERC721 token - EVM call 3_140///_140/// Importantly, the transaction is reverted if any of the EVM interactions fail returning the account to the original_140/// state before the transaction was executed across Cadence & EVM._140///_140/// For more context, see https://github.com/onflow/batched-evm-exec-example_140///_140/// @param wflowAddressHex: The EVM address hex of the WFLOW contract as a String_140/// @param maybeMintERC721AddressHex: The EVM address hex of the ERC721 contract as a String_140///_140transaction(wflowAddressHex: String, maybeMintERC721AddressHex: String) {_140_140 let coa: auth(EVM.Call) &EVM.CadenceOwnedAccount_140 let mintCost: UFix64_140 let wflowAddress: EVM.EVMAddress_140 let erc721Address: EVM.EVMAddress_140_140 prepare(signer: auth(SaveValue, BorrowValue, IssueStorageCapabilityController, PublishCapability, UnpublishCapability) &Account) {_140 /* COA configuration & assigment */_140 //_140 let storagePath = /storage/evm_140 let publicPath = /public/evm_140 // Configure a COA if one is not found in storage at the default path_140 if signer.storage.type(at: storagePath) == nil {_140 // Create & save the CadenceOwnedAccount (COA) Resource_140 let newCOA <- EVM.createCadenceOwnedAccount()_140 signer.storage.save(<-newCOA, to: storagePath)_140_140 // Unpublish any existing Capability at the public path if it exists_140 signer.capabilities.unpublish(publicPath)_140 // Issue & publish the public, unentitled COA Capability_140 let coaCapability = signer.capabilities.storage.issue<&EVM.CadenceOwnedAccount>(storagePath)_140 signer.capabilities.publish(coaCapability, at: publicPath)_140 }_140_140 // Assign the COA reference to the transaction's coa field_140 self.coa = signer.storage.borrow<auth(EVM.Call) &EVM.CadenceOwnedAccount>(from: storagePath)_140 ?? panic("A CadenceOwnedAccount (COA) Resource could not be found at path ".concat(storagePath.toString())_140 .concat(" - ensure the COA Resource is created and saved at this path to enable EVM interactions"))_140_140 /* Fund COA with cost of mint */_140 //_140 // Borrow authorized reference to signer's FlowToken Vault_140 let sourceVault = signer.storage.borrow<auth(FungibleToken.Withdraw) &FlowToken.Vault>(_140 from: /storage/flowTokenVault_140 ) ?? panic("The signer does not store a FlowToken Vault object at the path "_140 .concat("/storage/flowTokenVault. ")_140 .concat("The signer must initialize their account with this vault first!"))_140 // Withdraw from the signer's FlowToken Vault_140 self.mintCost = 1.0_140 let fundingVault <- sourceVault.withdraw(amount: self.mintCost) as! @FlowToken.Vault_140 // Deposit the mint cost into the COA_140 self.coa.deposit(from: <-fundingVault)_140_140 /* Set the WFLOW contract address */_140 //_140 // View the cannonical WFLOW contract at:_140 // https://evm-testnet.flowscan.io/address/0xd3bF53DAC106A0290B0483EcBC89d40FcC961f3e_140 self.wflowAddress = EVM.addressFromString(wflowAddressHex)_140_140 /* Assign the ERC721 EVM Address */_140 //_140 // Deserialize the provided ERC721 hex string to an EVM address_140 self.erc721Address = EVM.addressFromString(maybeMintERC721AddressHex)_140 }_140_140 pre {_140 self.coa.balance().inFLOW() >= self.mintCost:_140 "CadenceOwnedAccount holds insufficient FLOW balance to mint - "_140 .concat("Ensure COA has at least ".concat(self.mintCost.toString()).concat(" FLOW"))_140 }_140_140 execute {_140 /* Wrap FLOW in EVM as WFLOW */_140 //_140 // Encode calldata & set value_140 let depositCalldata = EVM.encodeABIWithSignature("deposit()", [])_140 let value = EVM.Balance(attoflow: 0)_140 value.setFLOW(flow: self.mintCost)_140 // Call the WFLOW contract, wrapping the sent FLOW_140 let wrapResult = self.coa.call(_140 to: self.wflowAddress,_140 data: depositCalldata,_140 gasLimit: 15_000_000,_140 value: value_140 )_140 assert(_140 wrapResult.status == EVM.Status.successful,_140 message: "Wrapping FLOW as WFLOW failed: ".concat(wrapResult.errorMessage)_140 )_140_140 /* Approve the ERC721 address for the mint amount */_140 //_140 // Encode calldata approve(address,uint) calldata, providing the ERC721 address & mint amount_140 let approveCalldata = EVM.encodeABIWithSignature(_140 "approve(address,uint256)",_140 [self.erc721Address, UInt256(1_000_000_000_000_000_000)]_140 )_140 // Call the WFLOW contract, approving the ERC721 address to move the mint amount_140 let approveResult = self.coa.call(_140 to: self.wflowAddress,_140 data: approveCalldata,_140 gasLimit: 15_000_000,_140 value: EVM.Balance(attoflow: 0)_140 )_140 assert(_140 approveResult.status == EVM.Status.successful,_140 message: "Approving ERC721 address on WFLOW contract failed: ".concat(approveResult.errorMessage)_140 )_140_140 /* Attempt to mint ERC721 */_140 //_140 // Encode the mint() calldata_140 let mintCalldata = EVM.encodeABIWithSignature("mint()", [])_140 // Call the ERC721 contract, attempting to mint_140 let mintResult = self.coa.call(_140 to: self.erc721Address,_140 data: mintCalldata,_140 gasLimit: 15_000_000,_140 value: EVM.Balance(attoflow: 0)_140 )_140 // If mint fails, all other actions in this transaction are reverted_140 assert(_140 mintResult.status == EVM.Status.successful,_140 message: "Minting ERC721 token failed: ".concat(mintResult.errorMessage)_140 )_140 }_140}
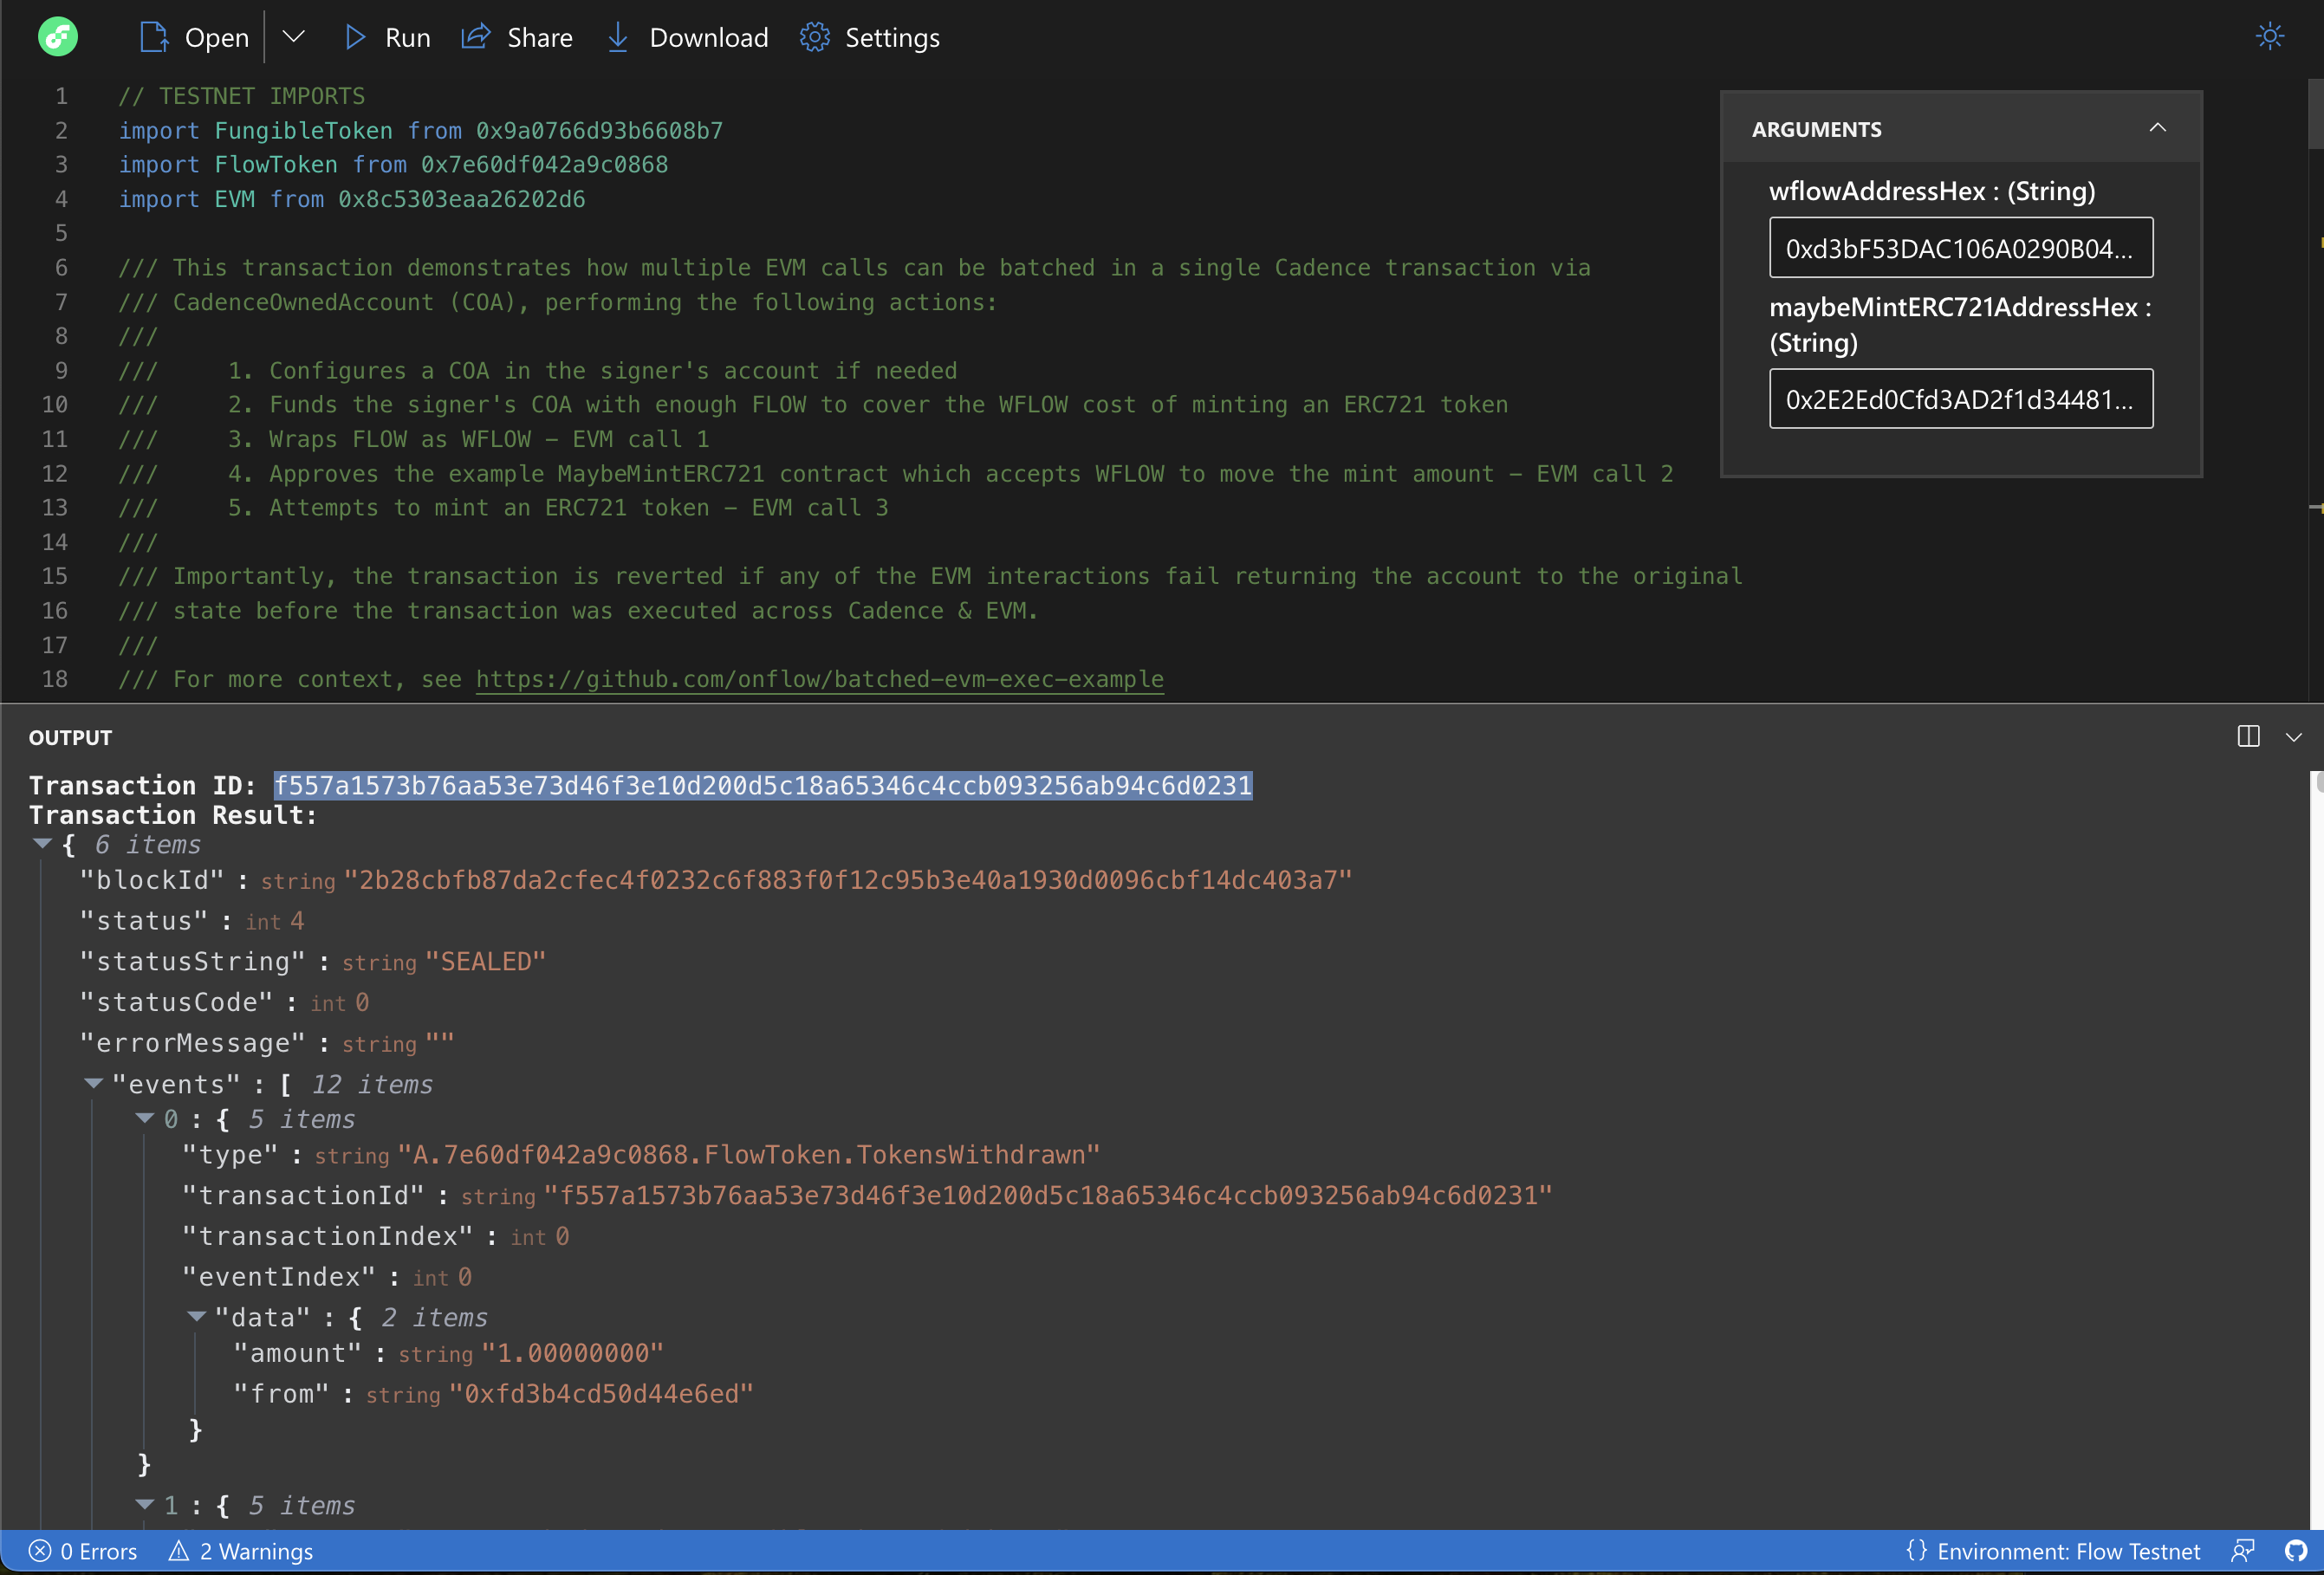
You can run the transaction at the following link with the community-developed Flow Runner tool: wrap_and_mint.cdc.
This transaction takes two arguments:
- WFLOW contract address:
0xd3bF53DAC106A0290B0483EcBC89d40FcC961f3e - MaybeMintERC721 contract address:
0x2E2Ed0Cfd3AD2f1d34481277b3204d807Ca2F8c2
Before you run the tool, ensure that the network section - bottom right corner - displays Testnet. If not, click and select Testnet as your network and refresh. Once you've confirmed you're Flow Runner is targeting Testnet, copy these addresses and paste them into the respective fields on the Flow Runner page. Click Run on the top left and follow the prompts to connect your Flow Wallet and sign the transaction.
Although we are running a manual transaction for the purposes of this walkthrough, always be careful to review the transaction details before you sign and submit.
Again, since the ERC721 has a 50% chance of failing, you may need to run the transaction multiple times until it succeeds. However, note that if the mint fails, the entire transaction will revert, unwinding the wrapped FLOW and approval.
Again, since the ERC721 has a 50% chance of failure and the success of the transaction is conditioned on successfully minting, your transaction may fail. If it does fail, importantly the entire transaction reverts, unwinding the wrapped FLOW deposit and approval - the wrapping and approval transactions do not execute in the event of mint failure! This is the main takeaway of this guide, that you embed a whole sequence of EVM transactions into one atomic operation using Cadence and if the primary intent (or intents) does not execute, everything else is reverted as well.
In our case, you'll want to submit a transaction until one succeeds. After you submit a successful transaction, you'll see a transaction ID with event logs in the Flow Runner output. Let's take a closer look at the transaction and its results in the Flowscan block explorer.
Copy your transaction ID and go to the Flowscan Testnet Cadence block explorer: Flowscan Cadence.
When you paste your transaction ID into the search bar, you'll see the transaction details, such as the Cadence script, execution status, and event logs. Click the EVM tab to view the EVM transactions batched in the Cadence transaction.
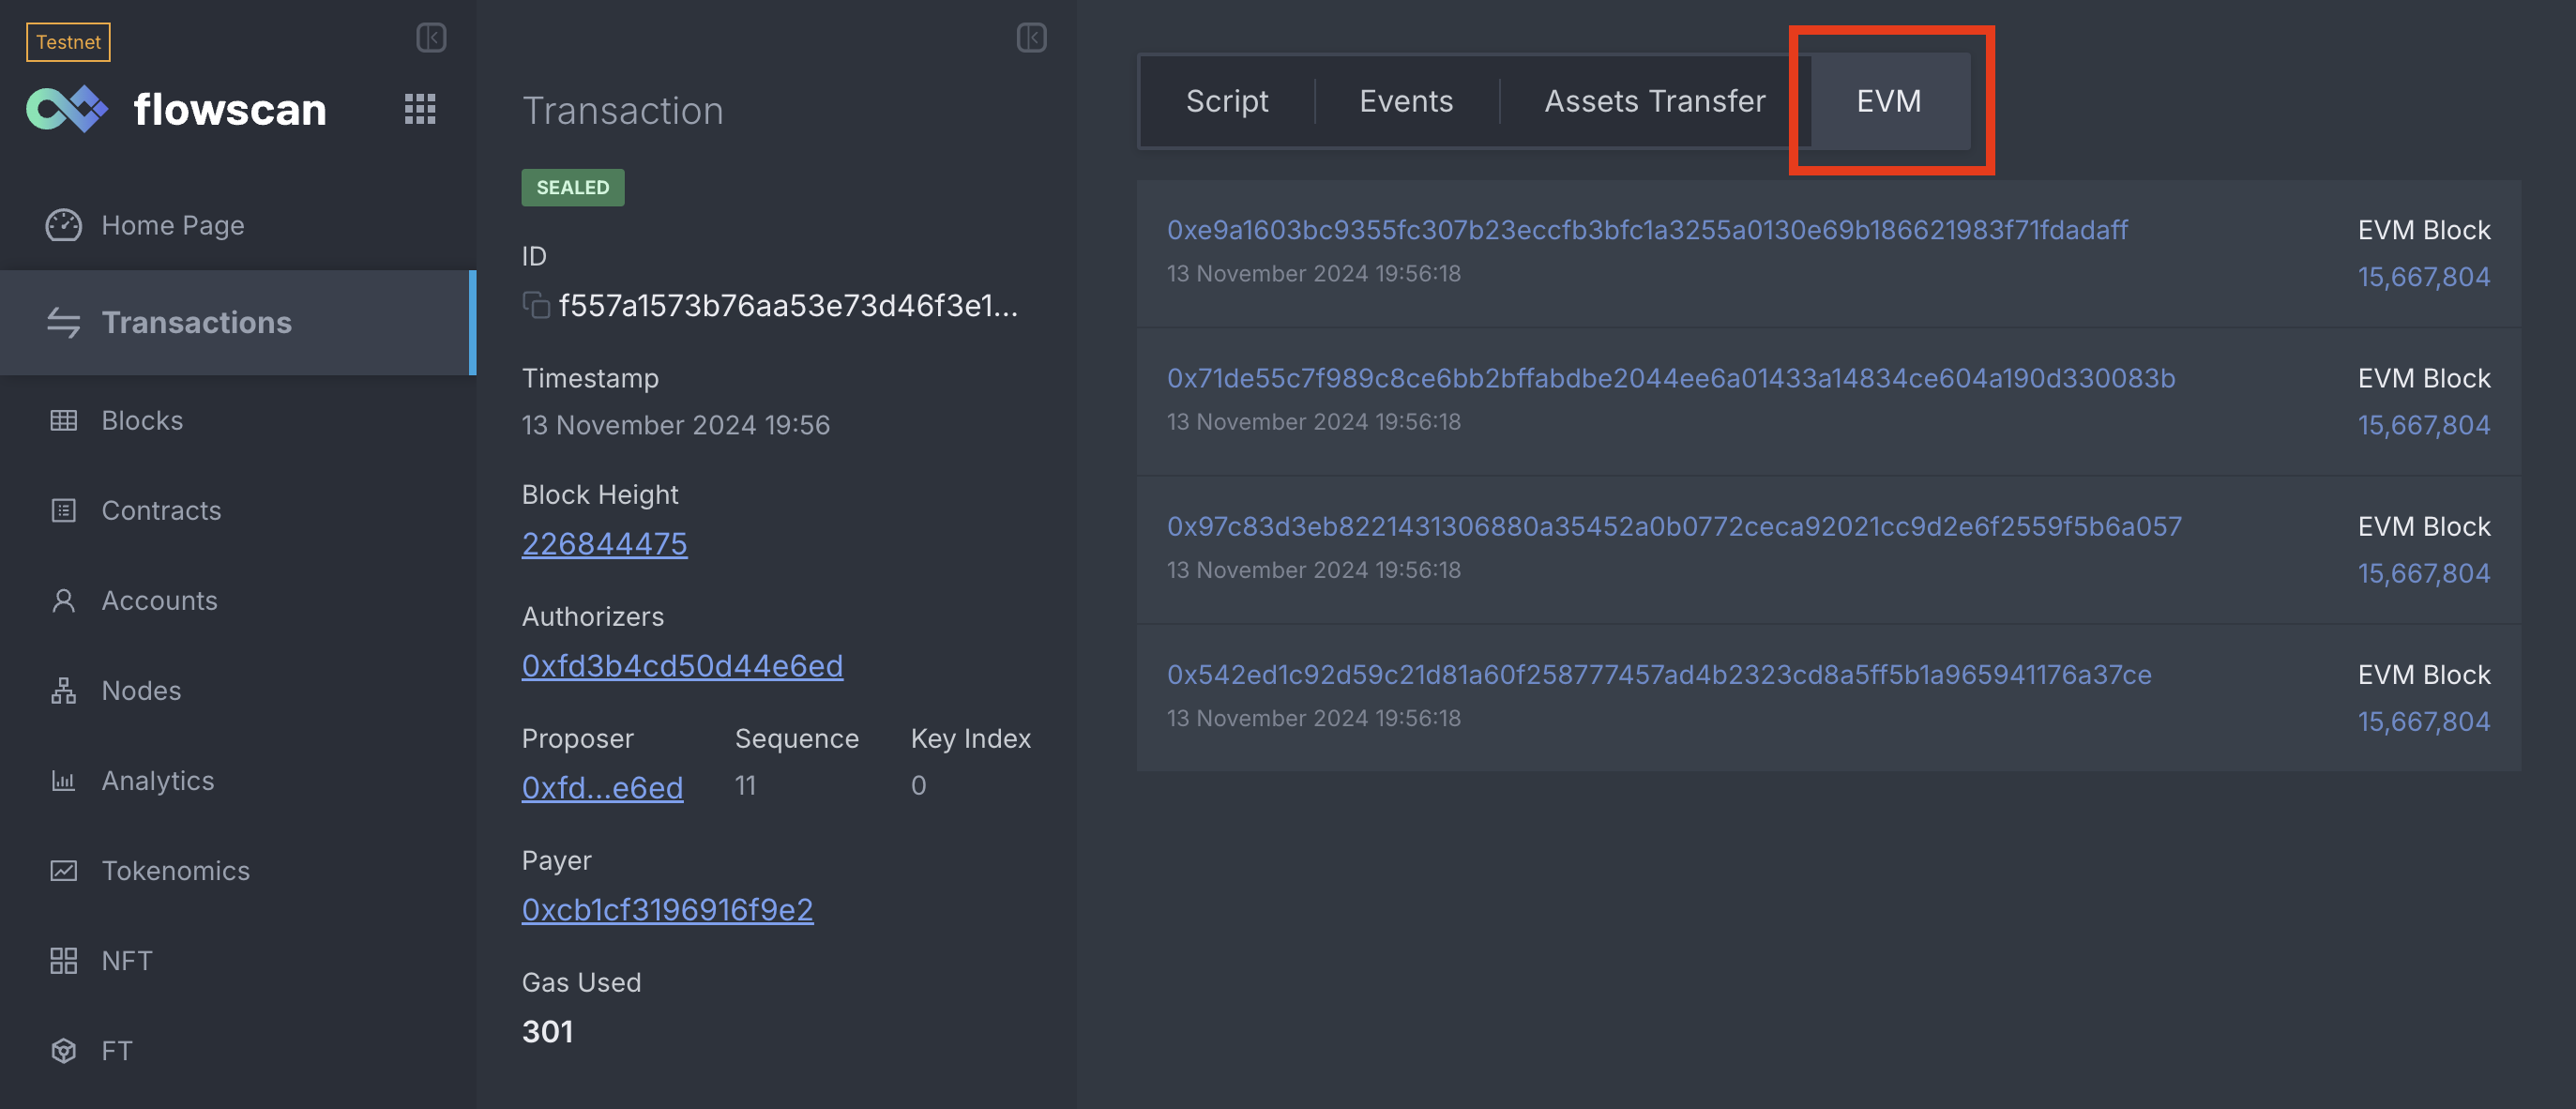
Click the transactions to open up the EVM transaction in Flowscan's EVM block explorer. If you view the EVM transactions in order, you'll notice that they aggregate the same actions we took manually in the MetaMask section, but this time in a single Cadence transaction!
Breaking it down
Now that we can relate to the pain of manually executing these transactions and we've seen the magic you can work with Cadence, let's understand what's going on under the hood.
To recap, our Cadence transaction does the following, reverting if any step fails:
- Wraps FLOW as WFLOW
- Approves the
MaybeMintERC721contract to move WFLOW - Attempts to mint a
MaybeMintERC721token
But how does our Flow account interact with EVM from the Cadence runtime? As you'll recall from the Interacting with COA guide, we use a Cadence-owned account (COA) to interact with EVM contracts from Cadence.
A COA is a resource providing an interface through which Cadence can interact with the EVM runtime. This is in addition to to the traditional routes you'd normally access normal EVMs - such as via the JSON-RPC API. And with this interface, we can take advantage of all of the benefits of Cadence - namely here scripted transactions and conditional execution.
So, in addition to the above steps, our transaction first configures a COA in the signer's account if one doesn't already exist. It then funds the COA with enough FLOW to cover the mint cost, sourcing funds from the signing Flow account's Cadence Vault. Finally, it wraps FLOW as WFLOW, approves the ERC721 contract to move the mint amount, and attempts to mint the ERC721 token.
Let's see what each step looks like in the transaction code.
COA Configuration
The first step in our transaction is to configure a COA in the signer's account if one doesn't already exist. To do this, create a new COA resource and save it to the signer account's storage. A public Capability on the COA is then issued and published on the signer's account, allowing anyone to deposit FLOW into the COA, affecting its EVM balance.
_21/* COA configuration & assignment */_21//_21let storagePath = /storage/evm_21let publicPath = /public/evm_21// Configure a COA if one is not found in storage at the default path_21if signer.storage.type(at: storagePath) == nil {_21 // Create & save the CadenceOwnedAccount (COA) Resource_21 let newCOA <- EVM.createCadenceOwnedAccount()_21 signer.storage.save(<-newCOA, to: storagePath)_21_21 // Unpublish any existing Capability at the public path if it exists_21 signer.capabilities.unpublish(publicPath)_21 // Issue & publish the public, unentitled COA Capability_21 let coaCapability = signer.capabilities.storage.issue<&EVM.CadenceOwnedAccount>(storagePath)_21 signer.capabilities.publish(coaCapability, at: publicPath)_21}_21_21// Assign the COA reference to the transaction's coa field_21self.coa = signer.storage.borrow<auth(EVM.Call) &EVM.CadenceOwnedAccount>(from: storagePath)_21 ?? panic("A CadenceOwnedAccount (COA) Resource could not be found at path ".concat(storagePath.toString())_21 .concat(" - ensure the COA Resource is created and saved at this path to enable EVM interactions"))
At the end of this section, the transaction now has an reference authorized with the EVM.Call entitlement to use in the execute block which can be used call into EVM.
You can run a transaction that does just this step here: setup_coa.cdc
Since you ran the all-in-one transaction previously, your account already has a COA configured in which case the linked transaction won't do anything. You can lookup your Testnet account's EVM address with the script below to confirm you have a COA configured. Simply input your Testnet Flow address and click Run.
Fund the COA
Next, we fund the COA with enough FLOW to cover the mint cost. To do this, withdraw FLOW from the signer's FlowToken Vault and deposit it into the COA.
_13/* Fund COA with cost of mint */_13//_13// Borrow authorized reference to signer's FlowToken Vault_13let sourceVault = signer.storage.borrow<auth(FungibleToken.Withdraw) &FlowToken.Vault>(_13 from: /storage/flowTokenVault_13 ) ?? panic("The signer does not store a FlowToken Vault object at the path "_13 .concat("/storage/flowTokenVault. ")_13 .concat("The signer must initialize their account with this vault first!"))_13// Withdraw from the signer's FlowToken Vault_13self.mintCost = 1.0_13let fundingVault <- sourceVault.withdraw(amount: self.mintCost) as! @FlowToken.Vault_13// Deposit the mint cost into the COA_13self.coa.deposit(from: <-fundingVault)
Taking a look at the full transaction, we can see an explicit check that the COA has enough FLOW to cover the mint cost
before proceeding into the transaction's execute block.
_10pre {_10 self.coa.balance().inFLOW() >= self.mintCost:_10 "CadenceOwnedAccount holds insufficient FLOW balance to mint - "_10 .concat("Ensure COA has at least ".concat(self.mintCost.toString()).concat(" FLOW"))_10}
This isn't absolutely necessary as successive steps would fail on this condition, but helps provide enhanced error messages in the event of insufficient funds.
You can run the above block in a transaction here which will move one FLOW from your account's Cadence FLOW balance to your account's EVM balance and deposit it directly to your pre-configured COA: fund_coa.cdc
After you run the linked transaction, you can check your COA's FLOW balance with the script below, just enter your COA's EVM address (which you can get from the previous script). The balance should be 1.0 (unless you've funded your COA prior to this walkthrough).
Setting our EVM contract argets
The last step in our transaction's prepare block is to deserialize the provided WFLOW and ERC721 contract addresses
from hex strings to EVM addresses.
_10/* Set the WFLOW contract address */_10//_10// View the cannonical WFLOW contract at:_10// https://evm-testnet.flowscan.io/address/0xd3bF53DAC106A0290B0483EcBC89d40FcC961f3e_10self.wflowAddress = EVM.addressFromString(wflowAddressHex)_10_10/* Assign the ERC721 EVM Address */_10//_10// Deserialize the provided ERC721 hex string to an EVM address_10self.erc721Address = EVM.addressFromString(maybeMintERC721AddressHex)
Wrapping FLOW as WFLOW
Next, we're on to the first EVM interaction - wrapping FLOW as WFLOW. To do this, encode the deposit() function call and sett the call value to the mint cost. The COA then calls the WFLOW contract with the encoded calldata, gas limit, and value.
_17/* Wrap FLOW in EVM as WFLOW */_17//_17// Encode calldata & set value_17let depositCalldata = EVM.encodeABIWithSignature("deposit()", [])_17let value = EVM.Balance(attoflow: 0)_17value.setFLOW(flow: self.mintCost)_17// Call the WFLOW contract, wrapping the sent FLOW_17let wrapResult = self.coa.call(_17 to: self.wflowAddress,_17 data: depositCalldata,_17 gasLimit: 15_000_000,_17 value: value_17)_17assert(_17 wrapResult.status == EVM.Status.successful,_17 message: "Wrapping FLOW as WFLOW failed: ".concat(wrapResult.errorMessage)_17)
When you set the value of the call, it transmits FLOW along with the call to the contract, accessible in solidity as msg.value.
You'll notice a general pattern among all EVM calls in this transaction:
- Encoding the calldata
- Calling the contract
- Asserting the call was successful
Here we're just interested in a successful call, but we could access return data if it were expected and relevant for our Cadence transaction. This returned data is accessible from the data field on the EVM.Result object returned from coa.call(...). This data would then be decoded with EVM.decodeABI(...). More on this in later guides.
You can run the above code as a transaction here: wrap_flow.cdc
After you run the transaction, your COA should have a WFLOW balance of 1.0 WFLOW. To confirm your WFLOW balance, run the script below, and provide your Flow account address, the WFLOW address of 0xd3bF53DAC106A0290B0483EcBC89d40FcC961f3e and your COA's EVM address (retrieved from a previous script):
Since Solidity does not support decimal precision, the returned balance will look like a large number. In the case of WFLOW, to recover the decimals, shift the decimal place 18 digits to the left. Your account should have 1 WFLOW or 1000000000000000000 as returned.
The number of places to shift varies by ERC20 implementation -- the default value is 18, but it's not safe to assume this value. To check a token's decimal places, call ERC20.decimals()(uint8).
Approve the ERC721 contract
After the FLOW is wrapped as WFLOW, we approve the ERC721 contract to move the mint amount. To do this, encode the approve(address,uint256) calldata and call the WFLOW contract with the encoded calldata.
_18/* Approve the ERC721 address for the mint amount */_18//_18// Encode calldata approve(address,uint) calldata, providing the ERC721 address & mint amount_18let approveCalldata = EVM.encodeABIWithSignature(_18 "approve(address,uint256)",_18 [self.erc721Address, UInt256(1_000_000_000_000_000_000)]_18 )_18// Call the WFLOW contract, approving the ERC721 address to move the mint amount_18let approveResult = self.coa.call(_18 to: self.wflowAddress,_18 data: approveCalldata,_18 gasLimit: 15_000_000,_18 value: EVM.Balance(attoflow: 0)_18)_18assert(_18 approveResult.status == EVM.Status.successful,_18 message: "Approving ERC721 address on WFLOW contract failed: ".concat(approveResult.errorMessage)_18)
You can run this approval with the transaction. Passing the WFLOW address of 0xd3bF53DAC106A0290B0483EcBC89d40FcC961f3e and MaybeMintERC721 address of 0x2E2Ed0Cfd3AD2f1d34481277b3204d807Ca2F8c2
: approve_maybe_mint_erc721.cdc
The linked transaction will perform the approval step, which authorizes the ERC721 to transfer WFLOW to cover the mint cost when mint() is called. Confirm the contract allowance by running the script below. Pass your Flow address, WFLOW
address, ERC721 address, and your COA's EVM address.
The result is the amount of your WFLOW balance the ERC721 is allowed to transfer, which after the transaction should be 1 WFLOW, or 1000000000000000000 as returned.
Mint the ERC721 Token
Finally, we attempt to mint the ERC721 token. To do this, encode the mint() calldata and call the ERC721 contract with the encoded calldata. If the mint fails, the entire transaction is reverted.
_16/* Attempt to mint ERC721 */_16//_16// Encode the mint() calldata_16let mintCalldata = EVM.encodeABIWithSignature("mint()", [])_16// Call the ERC721 contract, attempting to mint_16let mintResult = self.coa.call(_16 to: self.erc721Address,_16 data: mintCalldata,_16 gasLimit: 15_000_000,_16 value: EVM.Balance(attoflow: 0)_16)_16// If mint fails, all other actions in this transaction are reverted_16assert(_16 mintResult.status == EVM.Status.successful,_16 message: "Minting ERC721 token failed: ".concat(mintResult.errorMessage)_16)
You can run the minting transaction here. Pass the ERC721 address of 0x2E2Ed0Cfd3AD2f1d34481277b3204d807Ca2F8c2:
mint.cdc
Again, this transaction may fail. But if you executed all the prior stepwise transactions according to the walkthrough, you can try again until the mint succeeds. Recall that you can view your transaction details using Cadence Flowscan which will also let you view the embedded EVM transactions in the EVM tab. Try it out, and see if you can figure out how to get your minted NFT's URI with the script below.
Recap
All of the stepwise transactions you just executed are compiled in the first Cadence transaction we ran. Hopefully, going through the process step by step illuminates the power and flexibility of Cadence, allowing you to write transactions as simple or as complex as you want.
While lengthy transactions can be intimidating and even a bit verbose at times, the flexibility afforded by the language means you are only limited by your imagination. Cadence transactions allow you to support the most streamlined of experiences, incorporating as many contracts as needed to support your use case.
Conclusion
In this guide, we've demonstrated how to batch EVM transactions using Cadence, allowing you to conditionally execute multiple EVM transactions in a single Cadence transaction. While this guide focused on relatively simple EVM operations, the principles can be applied to much more complex and interesting applications.
In the process, you learned how to:
- Read and write from smart contract functions on EVM Flowscan.
- Run a Cadence transaction from the browser using Flow Runner.
- Execute batched EVM transactions via a COA in a Cadence transaction.
- Condition final transaction execution on success of all EVM transactions.
- Inspect multiple EVM transactions embedded in a Cadence transaction with Flowscan block explorer.
The biggest takeaway here isn't the specific actions taken in this walkthrough, but the overarching concept that you can use Cadence as an orchestration layer to extend existing EVM contracts, which allows you to create unique user experiences with the power to differentiate your Web3 application.
With these basics in hand, you're ready to start building more complex applications that leverage the power of Cadence and the Flow blockchain. How will you use these features to build Web3's next killer app?
Further Reading
Now that you've experienced the power of Cadence and EVM interactions firsthand, we recommend checking out the following guides to deepen your understanding:
- How Flow EVM Works - Learn more about the Flow EVM and how it differs from traditional EVM platforms.
- Interacting with COAs - Get a fuller picture of how Cadence interacts with EVM contracts via Cadence-owned accounts.
- Cadence Transactions - Learn more about the Cadence transaction model.
Ready to level up your Cadence skills? Take a look at these Cadence tutorials.